At Valley Marble & Tile, we pride ourselves on delivering unparalleled craftsmanship and sophistication through our premier countertop fabrication services.
How to install tiles on the floor?

Are you thinking of a new Floor Tile Installation? With a little preparation and the help of our guide, you can make your dream come true! A great do-it-yourself project that gives your house character and value is installing floor tiles. Even though it could appear overwhelming at first, it is surprisingly doable when broken down into manageable steps. Now gather your supplies, let your creative side go, and let’s begin tiling!
If you plan ahead, your DIY tiling project will go smoothly. This floor tile layout tutorial walks you through a crucial step in the tiling process that ensures a flawless installation. Planning ahead will guarantee that you have enough tiles and supplies to complete the project.
Laying out your floor tiles correctly is one of the most important aspects of the planning and preparation phase. This enables you to plan out your tile Installation layout using the actual tile measurements, including joint width, to avoid uncomfortable gaps and inconsistent results.
Preparation to Install Floor Tile – The Ultimate Guide
There is an important step to complete before you start laying down those gorgeous tiles which is subfloor preparation. Although it may seem unimportant, a properly prepared subfloor is the cornerstone of an exquisite and durable tiled work of art. This is what you must do:
Eliminate contamination
Verify that there is no grease, oil, dust, or grime on the surface. Look for any indications of debonding or hollowness.
Prime the surface
To make a brush-on slurry, combine one part adhesive, one part water, and one part primer. Before tiling, apply the primer and allow it to dry.
Prepare the base
Create a level, smooth plywood or masonry base. It may be necessary to remove old flooring and smooth the surface if you’re remodeling.
Cutting the tiles
Before you begin putting the tiles down, use a tile cutter to create precise, clean cuts. Since adhesive sets quickly, it’s advisable to complete this step first.
Must-Haves Materials And Mortar & Laying

Now that you have prepared your subfloor like a pro, it is time to gather the essential materials and tackle the magic of laying the mortar! The tile floor may be laid easily if you have the correct tools. The following is a list of materials required to lay tile flooring:
- Tile Sticking substance
- Grout Remover
- System of tile levelling
- Grout float using a trowel
- Tools for cutting tiles
- Sealants
- Equipment for personal protection
In the next step, it is time to combine the mortar and begin installing the tiles! Here’s a detailed how-to:
Mixing the Mortar
In accordance with the manufacturer’s directions, blend the thin-set mortar until it achieves a uniform, peanut butter-like texture. Remember that mortar has a limited working duration, usually around half an hour, so mix tiny portions at a time.
Start Spreading
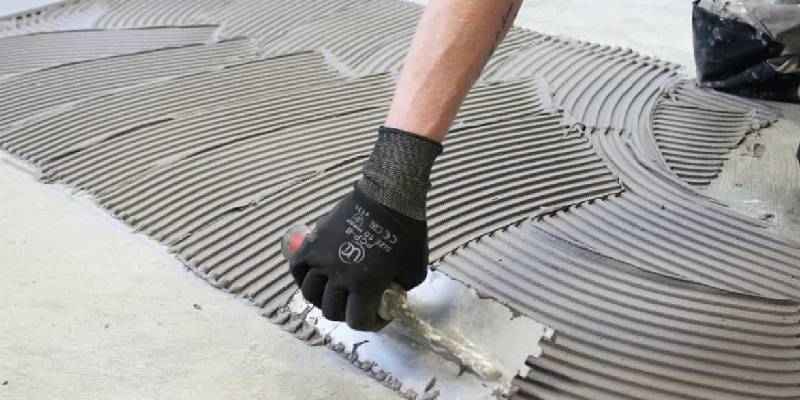
Starting in the middle and working outward in small pieces, spread the mortar onto a controllable portion of the subfloor with the notched trowel. When spreading the mortar, keep the trowel in a continuous ridge pattern; this will help ensure a strong binding with the tiles.
Laying the First Tile
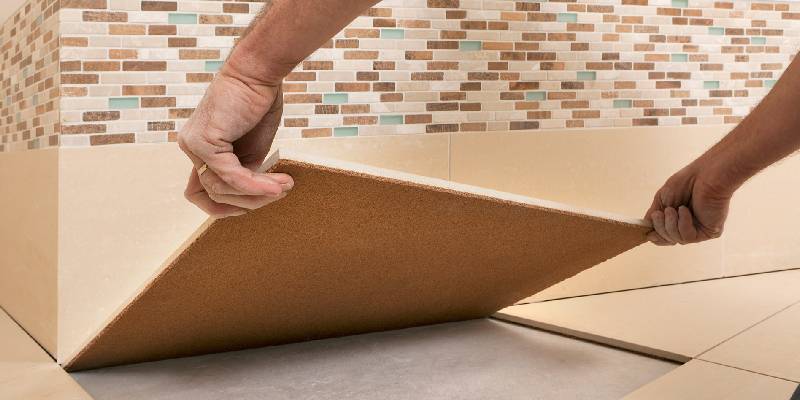
Here’s the thrilling stage where your creation starts to take form! Place the first tile carefully onto the spread mortar, making sure it fits into the design you have in mind and follows the requirements for spacing provided by the tile spacers. Use the rubber mallet to tap and gently press the tile into position. Proceed to install tiles one at a time, adhering to your plan and making sure to use spacers consistently to keep uniform spaces between tiles. Work in little segments, spreading mortar slightly in front of the tile placement area. Using your level, check your level frequently and alter the tiles as necessary.
Taking Care of Corners and Edges
You will need to cut tiles to fill in those unavoidably unpleasant regions around the edges. Make accurate, clean cuts with your tile cutter. Using the cutter, score the tile, and then carefully press to break it along the score line. To gain the feel of it, practice first on unused tiles.
Give it time to settle
Avoid the temptation to walk on the floor once you have covered it completely! As per the manufacturer’s specified drying time, let the mortar cure completely. Usually, this takes 24 to 48 hours. Walking on uncured mortar might interrupt the bonding process and cause future issues, therefore patience is essential in this situation.
Remove the Spacers
It takes care to remove the spacers when the mortar has dried. The last thing you need to do is scratch the freshly installed grout or upset the tiles. To carefully wiggle and remove the spacers from the spaces between the tiles, use your fingers or needle-nose pliers.
Filling the Gaps
Grout should be forced into the spaces between tiles by working it diagonally across them with a grout float, a diagonal rubber instrument. Use a 45-degree angle when applying the grout to make sure all of the spaces are filled in. Try to spread the grout in little parts rather than all at once.
Cleaning up
It’s time to remove any dust and grout residue that remains after grouting is finished. Wipe the entire tiled area and the surrounding area down with a moist towel.
Tips & Tricks For Tiling Triumph

Whether it is your bathroom, kitchen floor tile installation and Maintenance, you have to be careful in every nook and cranny. Here are some tips and tricks you need to follow in order to achieve tiling triumph:
Double-check your layout:
To make sure your layout is ideal, dry-lay the tiles one more before preparing the mortar.
Work in brief bursts:
Work in reasonable parts, especially while handling mortar, so as not to let it dry up before laying your tiles.
Clean, clean, and clean:
Spills of excess grout or mortar should be cleaned up right once to avoid them drying out and becoming harder to remove.
Wear knee pads:
Long periods of kneeling are common during tiling. Invest in knee protectors to prevent soreness in your knees!
If you want top-notch services for your bathroom, kitchen tiles, or ceramic floor tile installation, contact Valley Marble Tiles!
Conclusion
Take pleasure in the procedure! The process of tiling your floor can be satisfying. Be proud of the effort you have put in and relish creating a beautiful and functional space. You will be well on your way to revamping your floor and becoming a tiling expert by following these instructions and applying these useful tips. We hope our guide to Floor Tile Installation will help you create the floors of your dreams!
Are you thinking of a new Floor Tile Installation? With a little preparation and the help of our guide, you can make your dream come true! A great do-it-yourself project that gives your house character and value is installing floor tiles. Even though it could appear overwhelming at first, it is surprisingly doable when broken down into manageable steps. Now gather your supplies, let your creative side go, and let’s begin tiling!
If you plan ahead, your DIY tiling project will go smoothly. This floor tile layout tutorial walks you through a crucial step in the tiling process that ensures a flawless installation. Planning ahead will guarantee that you have enough tiles and supplies to complete the project.
Laying out your floor tiles correctly is one of the most important aspects of the planning and preparation phase. This enables you to plan out your tile Installation layout using the actual tile measurements, including joint width, to avoid uncomfortable gaps and inconsistent results.
Preparation to Install Floor Tile – The Ultimate Guide
There is an important step to complete before you start laying down those gorgeous tiles which is subfloor preparation. Although it may seem unimportant, a properly prepared subfloor is the cornerstone of an exquisite and durable tiled work of art. This is what you must do:
Eliminate contamination
Verify that there is no grease, oil, dust, or grime on the surface. Look for any indications of debonding or hollowness.
Prime the surface
To make a brush-on slurry, combine one part adhesive, one part water, and one part primer. Before tiling, apply the primer and allow it to dry.
Prepare the base
Create a level, smooth plywood or masonry base. It may be necessary to remove old flooring and smooth the surface if you’re remodeling.
Cutting the tiles
Before you begin putting the tiles down, use a tile cutter to create precise, clean cuts. Since adhesive sets quickly, it’s advisable to complete this step first.
Must-Haves Materials And Mortar & Laying

Now that you have prepared your subfloor like a pro, it is time to gather the essential materials and tackle the magic of laying the mortar! The tile floor may be laid easily if you have the correct tools. The following is a list of materials required to lay tile flooring:
- Tile Sticking substance
- Grout Remover
- System of tile levelling
- Grout float using a trowel
- Tools for cutting tiles
- Sealants
- Equipment for personal protection
In the next step, it is time to combine the mortar and begin installing the tiles! Here’s a detailed how-to:
Mixing the Mortar
In accordance with the manufacturer’s directions, blend the thin-set mortar until it achieves a uniform, peanut butter-like texture. Remember that mortar has a limited working duration, usually around half an hour, so mix tiny portions at a time.
Start Spreading
Starting in the middle and working outward in small pieces, spread the mortar onto a controllable portion of the subfloor with the notched trowel. When spreading the mortar, keep the trowel in a continuous ridge pattern; this will help ensure a strong binding with the tiles.
Laying the First Tile
Here’s the thrilling stage where your creation starts to take form! Place the first tile carefully onto the spread mortar, making sure it fits into the design you have in mind and follows the requirements for spacing provided by the tile spacers. Use the rubber mallet to tap and gently press the tile into position. Proceed to install tiles one at a time, adhering to your plan and making sure to use spacers consistently to keep uniform spaces between tiles. Work in little segments, spreading mortar slightly in front of the tile placement area. Using your level, check your level frequently and alter the tiles as necessary.
Taking Care of Corners and Edges
You will need to cut tiles to fill in those unavoidably unpleasant regions around the edges. Make accurate, clean cuts with your tile cutter. Using the cutter, score the tile, and then carefully press to break it along the score line. To gain the feel of it, practice first on unused tiles.
Give it time to settle
Avoid the temptation to walk on the floor once you have covered it completely! As per the manufacturer’s specified drying time, let the mortar cure completely. Usually, this takes 24 to 48 hours. Walking on uncured mortar might interrupt the bonding process and cause future issues, therefore patience is essential in this situation.
Remove the Spacers
It takes care to remove the spacers when the mortar has dried. The last thing you need to do is scratch the freshly installed grout or upset the tiles. To carefully wiggle and remove the spacers from the spaces between the tiles, use your fingers or needle-nose pliers.
Filling the Gaps
Grout should be forced into the spaces between tiles by working it diagonally across them with a grout float, a diagonal rubber instrument. Use a 45-degree angle when applying the grout to make sure all of the spaces are filled in. Try to spread the grout in little parts rather than all at once.
Cleaning up
It’s time to remove any dust and grout residue that remains after grouting is finished. Wipe the entire tiled area and the surrounding area down with a moist towel.
Tips & Tricks For Tiling Triumph
Whether it is your bathroom, kitchen floor tile installation and Maintenance, you have to be careful in every nook and cranny. Here are some tips and tricks you need to follow in order to achieve tiling triumph:
Double-check your layout:
To make sure your layout is ideal, dry-lay the tiles one more before preparing the mortar.
Work in brief bursts:
Work in reasonable parts, especially while handling mortar, so as not to let it dry up before laying your tiles.
Clean, clean, and clean:
Spills of excess grout or mortar should be cleaned up right once to avoid them drying out and becoming harder to remove.
Wear knee pads:
Long periods of kneeling are common during tiling. Invest in knee protectors to prevent soreness in your knees!
If you want top-notch services for your bathroom, kitchen tiles, or ceramic floor tile installation, contact Valley Marble Tiles!
Conclusion
Take pleasure in the procedure! The process of tiling your floor can be satisfying. Be proud of the effort you have put in and relish creating a beautiful and functional space. You will be well on your way to revamping your floor and becoming a tiling expert by following these instructions and applying these useful tips. We hope our guide to Floor Tile Installation will help you create the floors of your dreams!
Other Services
Our Service Area
Salem | Albany | Corvallis | Portland | Tigard
